Is it really possible to get through a Wisconsin winter on solar electricity alone? We had a 10-day cold snap last February and it got down to minus 17 degrees F. My air-source heat pump (mini-split) was working hard — and consuming lots of power.
When I set out to build a net-zero house (and afford it), I knew my design had to be small and smart. My goal was a grid-tied, all-electric, fossil-fuel free, net-zero energy home that was super-insulated and super-airtight. I knew I couldn’t spend freely on uber-expensive windows or cutting-edge high performance materials. I’d have to rely on mostly standard construction methods and off-the-shelf products. I learned from other builders that the cost of extra layers of insulation and the hours spent sealing up every hole and seam could be partially offset by replacing a standard forced air gas or oil-powered furnace and separate air conditioner with a single, centrally located ductless mini-split powered by a solar photovoltaic system.
To further reduce my electricity load, I chose energy-efficient appliances and LED lighting. Even so, was I risking bursting pipes, weekend service calls, or a spartan lifestyle just to prove a point? What was all this going to cost? How many solar panels would I need? What’s a reasonable payback? Would I have to alter my design? Aren’t solar panels ugly? Would my house look like a middle school science project? Here are the steps I took to answer these questions:
Step 1: How much electricity will my home use?
Before I could select a mini-split or decide how many solar panels to install, I had to know how much electricity my home would use. I looked at a number of energy modeling programs before choosing REM/Design. This user-friendly software is recognized by ENERGY STAR and comes with a free 14-day download. I knew my foundation, wall, and ceiling insulation R-values from my plan. To complete the required inputs, I looked up the manufacturer’s specifications for my proposed windows, heating/cooling equipment, appliances, and lighting. The program predicted my electricity loads would be:
Function kWh/year
Heating: 5,246
Cooling: 527
Hot Water: 3,040
Lights & Appliances: 4,601
Total Electrical Demand: 13,414
Step 2: What size solar system should I install?
After consulting with Mike Dearing of Driftless Solar, we decided on a 7.32 kW solar photovoltaic system with an estimated energy output of 10,766 kWh/year. This would fall short of the predicted electrical demand for my house by about 20%, but seemed reasonable. For one, I was pretty confident that my personal energy use would be less than the “typical” use patterns assumed by the energy model. If a future family’s use pattern turned out to be more demanding, more panels could be added. The other reason why this size system made sense was cost. Mike advised me that a 7 kW system was the largest he could economically install in a residential application given current electrical codes and existing technology. Several other solar installers I contacted advised sizing a system to 2/3 of demand in areas such as mine where “monthly true-up” is in place instead of true net metering.
Every utility company has a different rate structure. Alliant Energy serves my Village, and their standard residential rate is $0.12 kWh. Unlike many utilities, they don’t offer true net metering. My surplus in July won’t help me in December. Alliant calculates my bill by what’s called a “monthly true-up.” Each month, I can buy or sell as much or as little electricity as I like but it never carries over to the next month. When I use more than I produce in December, they charge me $0.12 kWh. When I produce more than I use in July, they buy from me at only $0.03 kWh.
Many states mandate true net metering that balances out energy production and use on a yearly basis and requires utilities to purchase your electricity at the same rate it sells it to you. Rates and details vary from utility to utility, so be sure to take this into account when sizing your solar system and calculating payback.
Step 3: How much electricity did I actually use and generate?
I’ve now lived in the house a full year. The solar system generated a surplus each month except for January, February, and December. When averaged over the year, it produced 53% more energy than I used! Here’s how it worked out:
Electricity Used March-Nov: 3,074 kWh
Electricity Used Jan, Feb, Dec: 2,714 kWh
Total Electricity Used: 5,788 kWh
System Output March-Nov: 8,018 kWh
System Output Jan, Feb, Dec: 821 kWh
Total System Output: 8,839 kWh (53% more than was used)
Surplus Sold March-Nov: 4,944 kWh@0.03=$148
Purchased Jan, Feb, Dec: 1,893 kWh@0.12=$227
Total Cost of Electricity: $227-148=$79.00/year or $6.58/month
Of course, utility companies don’t just charge you for the electricity you use. They tack on extra fees including a “meter charge”. My utility charges me about $0.51/day simply to be hooked to the grid. That means my actual bill averaged $22/month.
Step 4: How did it pencil out financially and what is my payback?
Sure, I hit my net zero energy goal and I’m super-proud, but how did it pencil out financially? I’m all about the environment and doing my part to invest in a fossil-free future for my grandchildren (and everyone’s grandchildren), but I’d like to know (and you probably do too): What did the system cost and what’s the payback? Here’s what my system cost:
Installed cost of 7.32 kW system $20,345
Focus on Energy incentive (State of Wisconsin) ($2,000)
Federal Tax Credit (30% in 2019) ($6,103) can roll over multiple years
My Cost $12,241
To calculate payback, I turned to Allison Bailes whose article “When You’re Financing a Green Home, Payback is Irrelevant” argues that the best way to evaluate an energy-efficiency improvement is to calculate monthly savings. I paid cash for my PV system, but to understand the concept of payback using Bailes’s method, I ran the numbers as if I’d rolled the cost of the system into my mortgage.
I chose a 25-year amortization because my solar photovoltaic system comes with a 25 year warranty. Assuming a 3% interest rate on my system’s cost of $12,241, my mortgage payment would be $58/month for 25 years. If I add my monthly electricity cost of $6.58 (calculated above), my total monthly payment is $65.
But what if I didn’t buy a solar system and instead bought all my electricity from the utility company? I used 5788 kWh/year or 482 kWh/month. My utilities rate is $0.12/kW, so my monthly electricity bill would be $58. That’s $7 less than in the scenario where I bought a solar photovoltaic system and mortgaged it for 25 years!
This proves that in my case, a solar photovoltaic system only makes financial sense when considered over the long term or if energy prices rise. If my system remains problem-free and continues to produce almost the same amount of electricity in year 26 (after I’ve paid off the mortgage), my monthly bill will continue to be $6.58 (assuming rates stay the same). If I never did buy a solar system and the utility raises its rates, my monthly bill will rise—perhaps to the point where I’d wish I’d invested in solar.
From a financial perspective, there’s no one right time to invest in solar but from an environmental perspective, the time is now. What I emphasize to my clients and friends who visit my house is that the important thing is super-insulation and super-airtight construction methods. When you do that, the home’s energy demands are so low that you can dispense with a conventional heating system powered by dirty fossil fuels and instead go all-electric and install an energy-efficient air source heat pump (mini-split). Then be sure to enroll in your utilities renewable energy program (if available) so that your house is 100% powered by clean energy. But if you can, invest in your own solar photovoltaic system. It may or may not have a “reasonable” payback, but it’s the right thing to do.
Step 5: If I could do it over, what would I change?
The payback for my system would be more favorable if I’d somewhat undersized it. Doing so would take better advantage of my utility’s rate structure. On the other hand, I could capitalize on my investment by plugging in an electric vehicle, allowing me to use the surplus electricity I produce 9 months of the year to power my car for almost nothing.
I haven’t looked into the costs or space requirements of storage batteries so I can go off-grid, but I’m pretty sure it would be considerably more than the $0.51/day I pay my utility to be a customer (explained above).
I didn’t alter the design of my house to maximize solar production. The 3:12 pitch is very low for my latitude and snowpack is a problem. There was a 10-day stretch this past winter when production came to a complete stop. It’s possible to clear panels with a snow rake, but mine are too high. Panels mounted on a rack on the ground could be kept clear and can be angled to an optimal pitch, but a rack costs considerably more than the mounting hardware installed on the standing seams of my metal roof.
Snow slides off faster on panels installed on a steep roof and they capture more solar energy. I played around with the PV Watts Calculator to find out what the optimal roof pitch is at my latitude. To make it easy, I just looked at annual production (not winter production). The optimal pitch is 8:12 which is typical of a Cape Cod or Arts & Crafts style house. When I dialed back to my more contemporary 3:12 pitch and increased the system size to match the annual production of the 8:12 pitch, I found I would need to add one extra solar panel. The panels from Driftless Solar were $510 each, installed. I think it’s safe to say that a steeper roof pitch or ground-mounted rack angled to the ideal pitch would cost significantly more than one extra solar panel. In this case, system inefficiency is best made up by simply adding more panels, which I did.
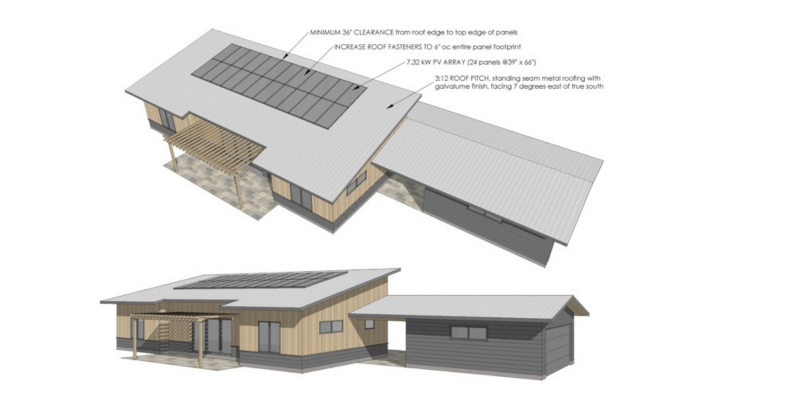
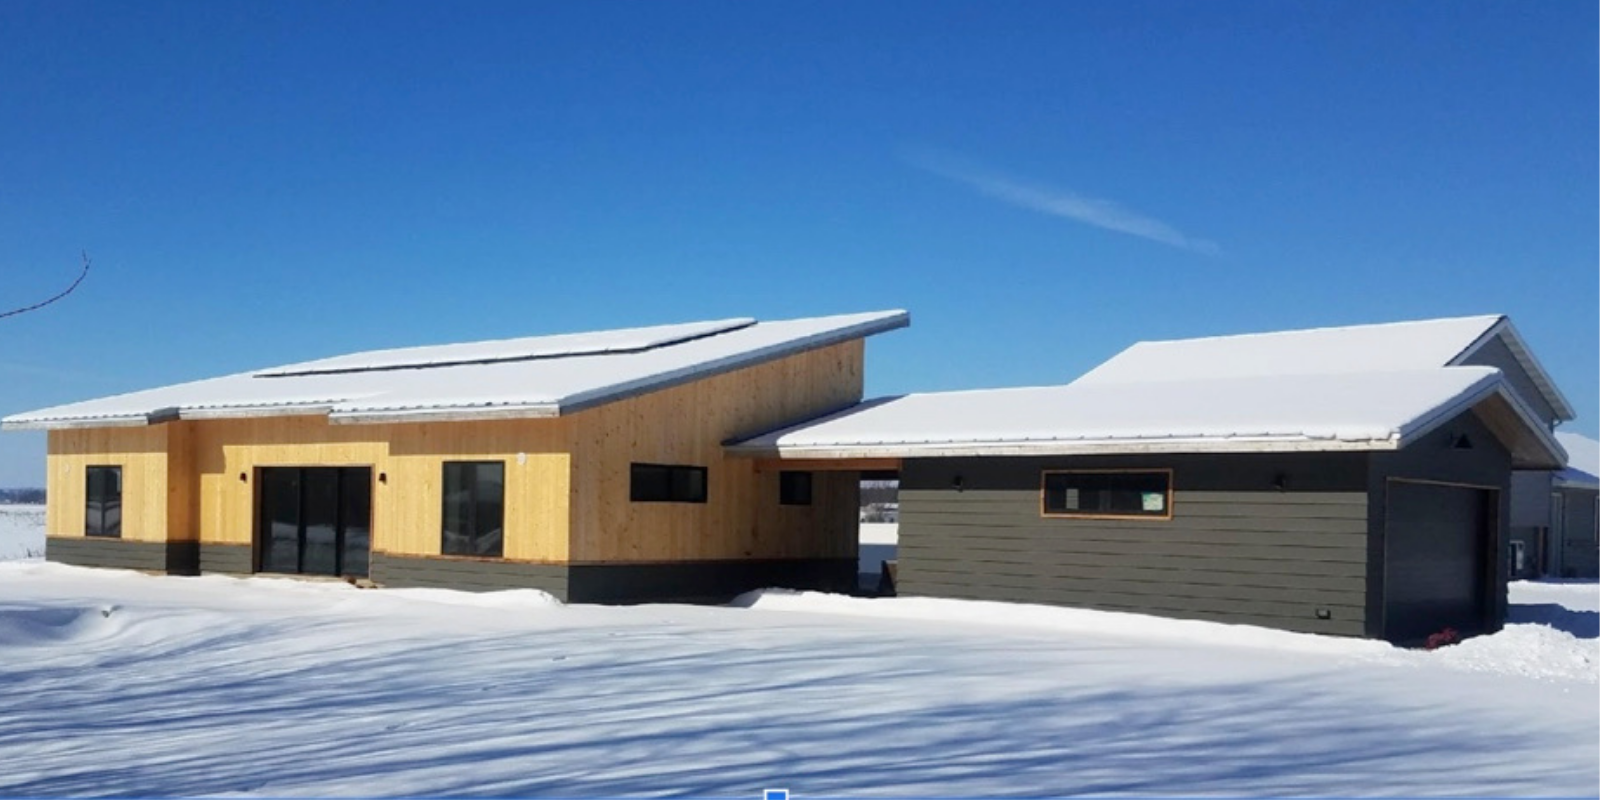
So do the solar panels make my house look ugly? I sure don’t think so! There are 24 panels, each 39” x 66 inches. I placed them high on the roof to clear any shading from neighboring trees. This placement also makes them less noticeable from the ground. I think it’s important to group panels in a uniform rectangle, choose panels with a uniform color, and if possible match their color to the color of the roof. The black painted frames of my system seem to blend better with the color of the glass than systems with light colored frames. Panels that jig and jog around roof obstacles or aren’t evenly placed detract.
I’m pleased with how my panels look and satisfied with my production. There haven’t been any problems. I only wish I lived in an area with net-metering, so I could make money each month and make a stronger case to my clients, who often ask about payback.
Please let me know if you have any questions about what I’ve explained here or if I can help you with your project. Shine on!
By Amber Westerman, Contractor and Designer, Poem Homes
Poem Homes is a design-build company focused on reducing resource use in new home construction and showing how living in a smaller, more modest home makes way for a more satisfying life.
amber@amberwesterman.com
Box 304, Spring Green, Wisconsin 53588-0304
608.935.9020

Paul Young says:
Excellent and clear article. Net metering would have been a slam dunk with a 30% smaller PV system. Likewise if the utility paid you closer to their peak demand price (sunny, mid day, hot weather) they’d get more supply when they needed it most.